How to Mail Merge Continue Next Record
*** UPDATE 2021 *** The below has helped a lot of people out over the years since it was written in 2013. I've recently had a much more advanced email merge to contend with, so inserting the link to that post here.
Advanced Mail Merge : Multiple clickable URL entries per mail to user
I opted to learn how to use the mail merge features of MS Word linked to Excel, as each year my wife goes on about the hassles that she gets whilst trying to mail 4000 people & how difficult it is to get it right.
So this is what I learnt as I cracked the issues that she couldn't, so this time next year her job will be that much easier.
I thought I'd add it as a blog post for two reasons, first to help you and second to remind me how to do it.
The first thing you need to do a mail merge is some data in Excel, I made up the following:
![]()
Next launch Word and write a letter.
Next click the Mailings tab, Start Mail Merge drop down and select Step by Step Mail Merge Wizard
Now for the fun bit, work your way through the wizard, select an your Excel file to use & add to the existing letter an Address Block from the left menu, this will add in the address for each person, then choose a Greeting Lineboth of these two options reduces the amount of work that you have to put into your letter and personalises it to the max.
Now to cover one of problems my wife was having, she wanted to being able to have 3 letters printed to 1 page, thus saving on paper. if you just copy and paste the text 3 times on the one Word document then this doesn't work, it'll just repeat the same persons name and address 3 times.
The way you get around this is by requesting the next record, do this by marking the start of the next block with«Next Record»
before the request for «AddressBlock», so you'll have your next record starting with:
«Next Record» «AddressBlock»
Time format, by default you'll get all sorts of weird time formats. To change what time format gets displayed you need to editing the field code with Edit Field… this is available by selecting it on a right click on the current field, in this case on the merge field marked«Time» Then Field Codes button and add the following to get just the hours without any seconds.
MERGEFIELD Time \@ "HH:mm"
The above information mixed with a little bit of trial and error with make you a master at the Mail Merge functionality of MS Office.
Top Tip: If at any point you feel that the Mail Merge Wizard is not doing what you ask it to do, then it most probably isn't. Its a complete wind up and learning how to do a mail merge by using the menu bar tools is the best advice I can give.
Second Top Tip: If at any point you want to remove the mail merge information from the word document, do so by opening the document, click on the Mailings tab, click the down arrow under the Start Mail Merge button, click on Normal Word Document. This will disconnect the Word document from the source document.
If you get a date out as 1899 then read this to explain all and fix the issue
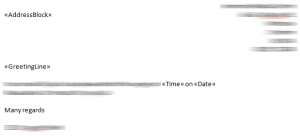
Image below shows how I manage to get multiple postcards on one page, each postcard reads a separate record:
 Click image to enlarge, it'll show that I have «AddressBlock» , «GreetingLine» , «Date» , «Time» inserted into the merge, each postcard is in a Text box, with smaller text boxes inside. This then keeps each merge record together, so when a «NextRecord» is called it knows where to put the details without missing any information. Like the issue that Karen is having below, if you read the comments.
Source: https://notsomany.com/2013/11/04/mail-merge/
0 Response to "How to Mail Merge Continue Next Record"
Enregistrer un commentaire